
This week I thought I would write a post demonstrating how to set up a blog. I have a background in Digital Media, but I have never used a WordPress site as a blog and as such, found it difficult to grasp the jargon used. In the past, I only ever used the pages and from there created sub-pages. It was fun delving into the world of Categories, Posts and Pages so I thought I would share what I have learned.
POSTS
A blogs default landing page is a digital journal page that updates as new posts are added. So when ADD NEW is selected under the POSTS heading, if your blog is still set on the default settings, that new post will appear at the top of your blog when you hit publish.

CREATE MENU NAVIGATION USING CATEGORIES VIA POSTS
Having a nice easy navigation is not so easy with Blogs unless you know how to manipulate the categories section.
In every post, off to the right hand side, there is a section: CATEGORIES. This is where you can make up the category sections (names) that you will later use to build your menu navigation with menu headings and sub headings.
I have made mine up into:
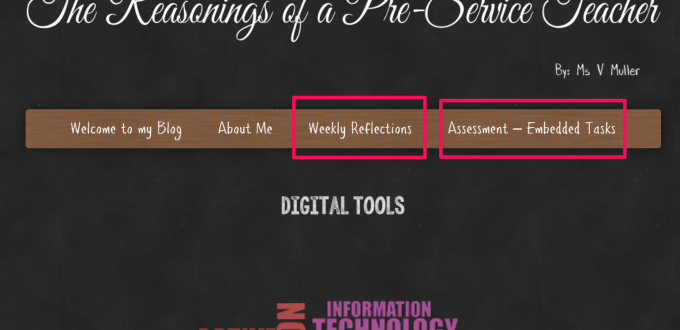
WEEKLY REFLECTIONS with
- Week 1,
- Week 2 etc… as sub headings and
ASSESSMENT -EMBEDDED TASKS with
- reflection 1,
- 2,
- 3 as sub headings.
The simplest way to set it up is to ADD NEW CATEGORY over on the right.
(You can also click on CATEGORIES, under the Heading POSTS).

Image 1
When you write your posts, even if you have a posts page as your landing page you can still select different categories for each post so they are easily navigated to via your menu. Image 1 demonstrates how I set up my WEEK 3 post.
Week 3 Post (Image 1) is a weekly task AND it is an Assessment – Embedded Task (reflection 1) Notice how I have put this post in all four categories?

This means that this post will appear in my POSTS page (in my case that is the WEEKLY REFLECTIONS PAGE), and it will appear in the sub menu – Week 1. PLUS, it will also appear under the Assessment – Embedded Tasks sub menu. Please see image 2.
MAKING A MENU
Once you have created all your categories you can then create your menu. Go to APPEARANCE, and select MENUS.

Once in Menus you can then decide which items you would like displayed in your menu. There are many different options. You can have pages, posts, categories, external links… the options are (almost) limitless.
I am just going to show you CATEGORIES but from here you can pretty much figure out the rest. Select CATEGORIES and then make sure you select ALL because it does default to MOST USED and that is not very helpful at this point.

Image 4
DO NOT WORRY if your categories are not in top menu, sub menu format because you can do all that via the menu structure.
Select all the ones you want in your menu and select ADD TO MENU. By default they ALL will land as TOP MENU selections. To make sub menus, all you do is DRAG the sub menu UNDER the one that will be the top menu.
PAGES
These are static and you can choose to have a page as the landing page of your blog if you wish. This is what I have chosen to do because I have always found the default settings, messy and hard to follow.
The pages on my blog are ABOUT ME and WELCOME TO MY BLOG. All the rest are posts. My menu is a mixture of pages (the two I just mentioned) and categories with sub categories.
Changing your default settings:
go to APPEARANCE then CUSTOMISE

Image 5
Static Front Page

Image 6
Then choose from blog posts, or static page.

Image 7
I hope this was helpful. Please, if you have any questions feel free to ask!